
diy: mixed paper envelopes - paperiaarre.com
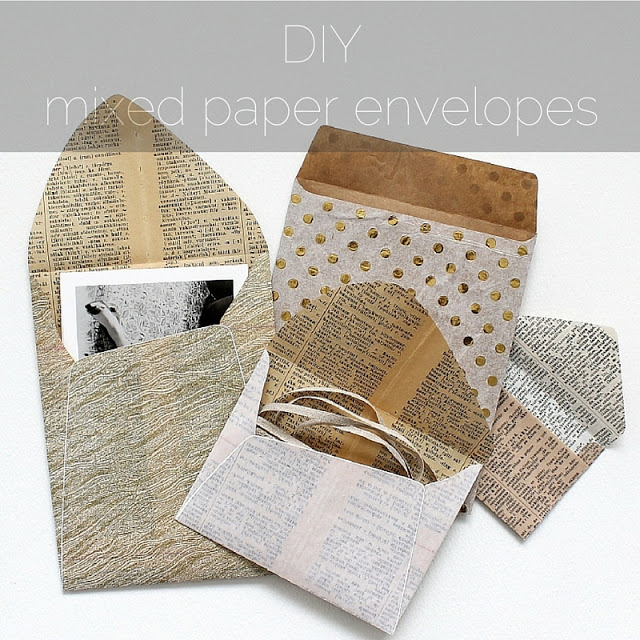
We're getting crafty today! I wrote you a tutorial on how to make a mixed paper envelope with asymmetrical flaps. This is a bit of a two-in-one tutorial: I'm showing how to design your own custom sized envelope from scratch AND I'm sharing a technique for fusing together mixed papers for one of a kind craft materials with endless possibilities for variation. Nothing prevents you from using either part of this tutorial independently, but this envelope project is a pretty sweet one, so you should definitely try it out!

diy: mixed paper envelopes - paperiaarre.com
Two envelopes made with photos printed on vellum paper, lined with dictionary pages. Two envelopes made with decorative tissue paper, lined with dictionary pages and kraft paper.
The variations are endless, really: you can use translucent papers (vellum or tissue, for example), patterned papers, brightly colored papers, recycled papers (magazines, newspapers), fabric etc. Furthermore, by fusing together different materials, you end up with two different sides to choose from - a printed photo would be lovely on the inside, as a liner, just as well.
The technique I teach you in the following tutorial allows you to make an envelope using pretty papers that would be too fragile to be used alone. Heavy weight papers and cardstocks, however, are not ideal for fusing as they will get quite bulky. If you have a gorgeous thick paper you'd like to use, you can skip the fusing part of this tutorial and use the paper on its own.
Designing your own envelope template is fun, and by making things from scratch you are limited only by your imagination. Your flaps can take any shape you want - this gorgeous envelope on Pinterest inspired this project! Unfortunately, I was unable to find a source for the photo even with reverse image search.
After getting comfortable with the template design process you can even abandon the traditional rectangular shape and go for triangles, or hexagons, etc. I've heard that in some countries irregular types of envelopes cost more to mail, so you may want to look into your country's regulations before cranking out dozens of triangular envelopes. But for envelopes traveling from hand to hand, you can let go of all the limitations you thought you had before.

diy: mixed paper envelopes - paperiaarre.com
The top envelopes were made using traditional envelope templates. For the two bottom ones I drew my own asymmetrical templates. For those I also added a white decorative edge using an opaque white marker.
What you need to make your own mixed paper envelope

diy: mixed paper envelopes - materials and tools needed / paperiaarre.com
materials:
mixed papers for your envelope (in this tutorial I used lightly striped vellum paper and book pages)
a few sheets of paper
a piece of waste paper
fusible adhesive (this is an option, but the adhesive I used is unbranded and sold by the yard)
a sheet or two of non-stick parchment paper (not wax paper!)
double sided adhesive tape (I used 3mm wide, but you could go wider), or glue
washi tape
tools:
pencil
opaque marker (optional)
scissors
ruler
bone folder (or a very blunt knife)
eraser
an iron and ironing board
an inkjet printer (if you want to print a photo onto you envelope like I did)
Before we begin:
I know this tutorial is terribly long, and honestly, making envelopes doesn't have to be this complicated. Sometimes you just want to make a very special envelope. That's the occasion this tutorial is for!
Not feeling confident about your crafting skills? Try a simplified version: 1. Skip making your own template. Take any envelope you have at hand and take it carefully apart. Use this envelope as your template. Or do an online search for envelope template and you'll find tons of templates to choose from. 2. Skip adhering layers of paper together. Pick just one pretty paper with some body, instead of sticking thinner papers together. Continue from step 14.
Read through the tutorial before you begin and make sure you have the necessary materials and tools. Also, please remember the end result of following this tutorial, more or less carefully, will not in any way reflect your value as a human being. Everyone who plays along gets a big virtual hug from me.
Now, it's time to get creative!

diy: mixed paper envelopes - photo printed on vellum paper / paperiaarre.com
1. If you feel like using a photo on your envelope, pick one. The size of paper your printer can handle does affect how big of an envelope you can make, so if you need a big envelope, skip the photo and pick something like a pretty tissue paper instead.
2. Copy and paste your chosen photo onto a new file on whatever program you use for your basic word processing needs. Determine what size of an envelope you need and resize the photo to match those measurements, cropping if necessary. If you want to address the envelope, you can add text to the photo at this stage!
3. Position the photo so there's room for creating all four envelope flaps around it and print it onto the vellum paper. I recommend using an inkjet printer as the ink laser printers use may not like being ironed later on.

4. Time to draw a template! Place a sheet of paper on top of your printed vellum paper and trace the outline of your photo (or if you're not using one, just draw a rectangle the size you want your envelope to be). If your printed photo isn't visible through the paper, you can do the tracing against a window or use a light box if you have one.
Because procrastination is something I excel at, I made a little animation about the envelope design process. Hopefully it clarifies the following steps a bit, even though it's probably more cute than informative.

diy envelope design animation - paperiaarre.com
Here are the still illustrations I used for the animation. They're much more practical for tutorial purposes.

diy: mixed paper envelopes - illustration of the stages of drawing an asymmetrical envelope template / paperiaarre.com
5. Draw flaps inside your rectangle. Decide the shape of the top flap first and draw it (forget symmetry! you can freestyle here!) Draw the opposite flap so that there's an overlap with the top one. I simply eyeballed the overlap, but if you want exact measurements, go with a ½" overlap. Draw side flaps - remember the overlap, again! Round all flap corners if you want.
You'll end up with a drawing of a rectangle with lots of overlapping lines inside it. Don't panic. We're going to make it work.
6. Take another sheet of paper and trace the same rectangle on it you did before. Now flip it so that your new rectangle sits against the top edge of your old one (top edges butting against each other, that is). Trace the top flap. It's now where it should be, outside your new rectangle. Flip the paper so that the bottom edges of the rectangles are butted against each other and trace the bottom flap. Repeat with the right and left flaps, making sure they go the right way round! You should now have a drawing of a rectangle with four flaps around it.
7. Cut out the template and fold the flaps towards the center. Is it awesome? Yeah? Move along to the next step. If the mock up is more meh than awesome, figure our what needs changing and draw another template using the cut-out as a base. It'll be worth it getting it right at this stage, I promise!

diy: mixed paper envelopes - tiling mixed papers / paperiaarre.com
8. If you're using smaller bits of paper, like book pages, for your envelope, determine how you're going to tile those pieces in order to create a large enough sheet. You can use glue to stick the bits together at this stage, but I use butted seams, or a teeny-tiny overlap, when I'm fusing this layer in step 13. At this stage we just plan the layout of all the bits and pieces. You can go a lot more complicated than my two spreads of book pages, but begin with something on the simple side.

diy: mixed paper envelopes - cutting out fusible adhesive / paperiaarre.com
9. Time to cut the fusible adhesive. Flip your template around so the lines you drew face the adhesive (not the carrier paper it's stuck on) and draw loosely around the template with a generous allowance (depending on your general accuracy level, something around 1/4-1" extra on all sides). You could also do this the other way round - not flipping the template, tracing on the paper side of the adhesive - but my adhesive material was a bit too slippery to handle that way round. Whichever way you decide to use, after you've traced generously around the template, cut the adhesive along that line.

diy: mixed paper envelopes - fusing papers together / paperiaarre.com
10. Place your template on the table drawn lines facing up. Top it with your printed vellum paper, photo face down, matching the photo with the rectangle on your template. Place your fusible adhesive topmost, rough glue side facing the vellum paper, carrier paper facing up. Make sure there's some extra adhesive extending beyond the template on all sides. Use a bit of tape to secure the adhesive sheet in place. You can now set your template aside for a while.
11. Sandwich your vellum paper + fusible adhesive with sheets of non-stick parchment paper so you won't get any adhesive onto your iron (or anything you may have on the bottom of your iron onto your envelope). Iron according to the instructions that come with the fusible adhesive you're using. Safe is always better than sorry.

diy: mixed paper envelopes - fusing papers together / paperiaarre.com
12. Let your project cool off a bit. Peel off the carrier paper of your fusible adhesive.

diy: mixed paper envelopes - fusing papers together / paperiaarre.com
13. Adhering the book pages/paper you chose for lining your envelope. This step is one of those "do as I say, not as I do" steps. Taking photos at my ironing board was simply too impractical.
On your ironing board, place the vellum paper adhesive facing up. Cover with tiled pieces of paper (use butted seams or just a teeny-tiny overlap between pieces) or with a single larger sheet. Remember that the side that faces adhesive will slightly show through the vellum paper and the side that faces up will form the lining of your envelope.
Top with non-stick parchment paper and iron according to instructions as before.
Your project should now look something like this:

diy: mixed paper envelopes - papers fused together / paperiaarre.com
Your paper sandwich may want to curl a bit. If it's very curly, you can gently roll it in the opposite direction until it stays flatter.
Next up - tracing the template:

diy: mixed paper envelopes - tracing the envelope template / paperiaarre.com
14. Place your paper sandwich down photo facing up. Fold in all the flaps of your template - the pencil lines of your rectangle stay on the outside. Match this folded template with the outlines of your photo. Carefully open the flaps, one by one, and trace the outline of the template onto the vellum paper.
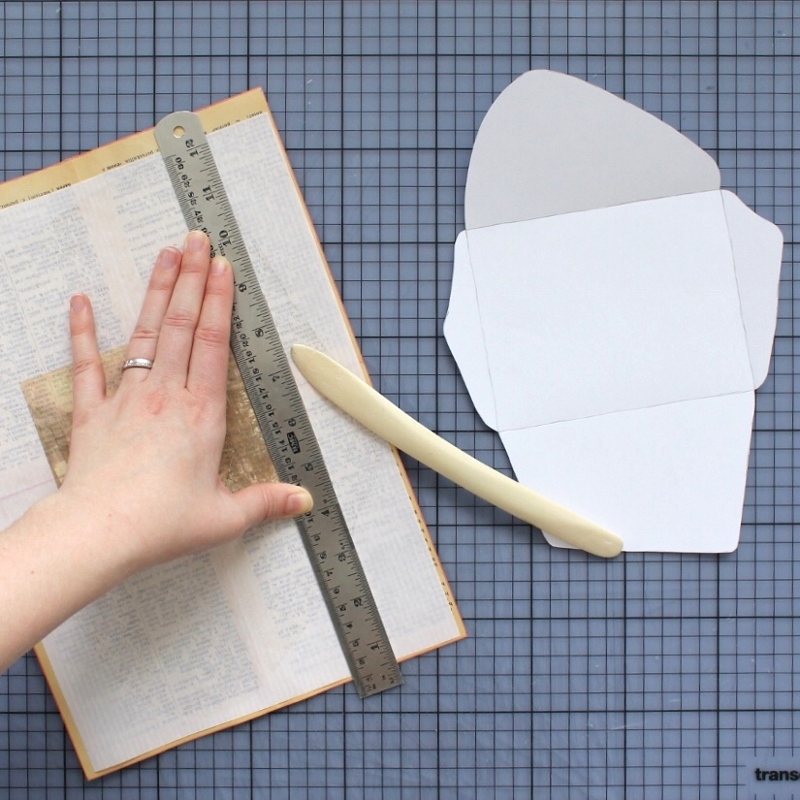
diy: mixed paper envelopes - scoring fold lines using a ruler and a bone folder / paperiaarre.com
15. Use a ruler and a bone folder to score fold lines along the edges of your photo (if you're not using a photo, then score along the fold lines of your template after you've cut out your envelope). If you don't have bone folder, you can use a very blunt knife (no cutting, just scoring!).

diy: mixed paper envelopes - cutting out the envelope, at last! / paperiaarre.com
16. Carefully cut out your envelope. Quite satisfying, isn't it? If there are pencil marks visible, erase them.

diy: mixed paper envelopes - folding in the flaps / paperiaarre.com
17. Fold in the flaps. Press the bone folder gently over the folds to make the folds crisper.

diy: mixed paper envelopes - optional edge decoration / paperiaarre.com
18. This step is entirely optional! Over a piece of scrap paper, use an opaque marker to paint a narrow decorative edge to your top and bottom flaps. I used opaque white on translucent white vellum paper, so it's not that visible in the above photo, but it does add a lovely little detail to the whole. You could use gold or silver marker and draw something more decorative than a simple line. I'm thinking scallops here...

diy: mixed paper envelopes - assembling the envelope / paperiaarre.com
19. Stick double sided adhesive tape on your bottom flap where it meets the side flaps. Use small bits one after another if you have very curved lines. Fold in the side flaps. Peel off the tape backing (if your tape has one) and stick the bottom flap down.
You could also use glue to assemble the envelope, but here I was much too impatient to wait for it to dry.

diy: mixed paper envelopes - final steps! / paperiaarre.com
20. Admire your handiwork. Fill the envelope. Close with a bit of washi tape, or however you desire. If your envelope is going to travel via postal service, I recommend using double sided adhesive tape along the whole top flap edge before adding any decorative closures.
All done!
I'd love to see how your envelope turned out! You can drop me a line (and a photo!) via email, or share a photo on Instagram or Twitter using the hashtag #paperiaarrediy (my envelopes are lonely!) and tagging me @paperiaarre
You can view the envelope animation in video format (with music!) on Instagram and tag your friends who might enjoy this project!
PS. If you run into issues creating your envelope, or if you feel this tutorial needs some clarifying, leave a comment or write me an email letting me know what steps you found problematic, and I'll get even more detailed!